Showing posts with label roast. Show all posts

Thursday, January 8, 2009

Roast quail with lime and black pepper

The marinade for this was inspired by a potato chip, of all things. Turns out, lime and pepper go just as well together as lemon and pepper do. This is a very simple, mild-flavoured marinade. You get a hint of lime, but mostly you can taste the quail flesh for what it is.

1 quail, wings and neck removed
2 limes, juiced with a single wedge retained
freshly ground black pepper
sea salt

Photobucket

Place the quail in a bowl. Grind some black pepper and sea salt all over it. Rub some into the cavity, too. Squeeze lime juice all over the bird. Turn it breast down, so the breasts--where most of the meat is--are soaking in the lime juice. Cover with cling film and keep in the fridge for a couple of hours.

Pre-heat the oven to 180*C. Place the quail on a lightly oiled baking tray and roast for 20 minutes.

Chinese five spice quail with a honey-soy glaze

The recipe below is enough to season a single quail.

Ingredients:

1 quail, wings and neck removed
3 cloves
2 star anise pods
1 cinnamon stick, snapped into shards
1 tbs whole Sichuan peppercorns
1/2 tsp ginger powder
2 tbs honey
1 tsp soy sauce

Pre-heat the oven to 180*C.

Photobucket

Using a mortar and pestle, grind up two of the cloves, one of the star anise pods, the Sichuan peppercorns, the ginger powder and all but one of the cinnamon shards. Rub this spice mix all over the quail. Stuff the cavity with the remaining clove, star anise pod and cinnamon shard. Place quail on a lightly oiled oven tray and roast for 10 minutes. Meanwhile, combine honey and soy sauce. Remove quail from the oven and baste generously in with the honey-soy glaze, before returning to the oven for a further ten minutes. Serve with steamed rice.

Wednesday, January 7, 2009

Quail Kiev

There are those who don't enjoy quail, claiming that eating quail is a bit like eating matchsticks. It's so small and bony, offering too little meat for them to feel that quail is worth the price butchers and poultry stores charge for it. I'm not one of those people. I adore quail. Grilled or stewed, roasted or deep-fried, I regard it as one of the most wonderful birds.

This dish was, of course, inspired by the popular Chicken Kiev--a flattened chicken breast which is rolled, filled with a garlic and herb butter and then coated in a batter. Typically, Kiev is deep-fried. My Kiev is roasted and, of course, uses quail in place of chicken.

I've allowed three quail per diner, but by all means, reduce that figure to two if you are worried your diners don't have such a large appetite.

Ingredients:

3 quail
2 cloves garlic, peeled
1 egg, beaten
1/2 cup bread crumbs (I used tempura bread crumbs, but you could make your own bread crumbs by blitzing some stale, but good quality bread in a food processor)
3 tbs fresh dill leaves
freshly ground black pepper, to taste
sea salt, to taste
olive oil

Pre-heat oven to 180*C.

Prepare the butter filling by playing the butter, dill leaves and garlic cloves in a food processor. Add a generous pinch of salt and a good grind of pepper before blitzing. Set the butter filling aside while you prepare the quail.

Photobucket

Wash quail inside and out under running water and pat dry. Using your chef's knife, remove the neck and the wings. Stuff cavity with the butter mixture. Be careful not to overfill--you're going to have to close the cavity in a minute and you don't want the stuff oozing out.

Photobucket

To close the cavity, carefully tie a length of kitchen string around the end of one of the legs. Then, gently pull both legs back so they're resting on the stumps where the wings used to be. Notice that the cavity is now closed, except for a small gap. Don't worry too much about that. Bind the tips of the legs together with the string.

Photobucket

Season the bread crumbs with sea salt and freshly ground black pepper. Coat the quail in the beaten egg and then dredge through the bread crumbs, ensuring the whole quail is covered. Place the quail in a lightly greased oven tray. Ensure that the side with the gap is facing up, otherwise the butter filling will leak out during cooking.

Photobucket

Roast for 20-25 minutes or until quail is cooked through.

Sunday, January 4, 2009

Roast duck with oriental spices

Photobucket

A lot of people are scared to cook duck at home. They're worried that it'll dry out. And sure, that can happen--but only if you don't cook it properly. Poultry stores sell duck breasts which can be pan fried, grilled or barbecued, but really, they're expensive and the flavour you get from grilling or frying is nowhere near as good as what can be experienced when you properly roast the whole beast.

Now, a word on serving. Two adults can work their way through a 1.2 kilogram chicken, no problem. A duck, though? You'd be struggling. The smallest ducks I've ever seen for sale, the ones I buy, they weigh about two kilograms. Don't worry, though. Cold duck meat is wonderful in a sandwich the next day. You could use it in a warm salad, too, as Bill Granger mentioned he does in the article that inspired this recipe.

Ingredients:

2 kilogram duck
1/4 cup honey
2 tbs coriander seeds
2 tbs Sichuan peppercorns
1 tbs light soy sauce
2 tsp whole cloves, plus four or five individual cloves for later
2 tsp whole fennel seeds
5 star anise pods
4 dried chillies
2 cloves of garlic, crushed
2 cinnamon sticks
1 shallot
sea salt

Use a cleaver or the back part of the blade of your chef's knife to remove the duck's wing tips, Pope's nose (the arse) and neck (if still attached). Wash the duck thoroughly inside and out with running water before patting it dry with paper towel. Using a skewer, carefully prick the bird all over. Don't go all the way through the flesh, though.

In a mortar and pestle or electric spice grinder, grind the coriander seeds, Sichuan peppercorns, cloves, fennel seeds, three of the star anise pods and one of the cinnamon sticks. When ground, combine with a generous pinch of sea salt and rub all over the bird. Get the spices into all the nooks and crannies, including the cavity. Stuff the cavity with two of the dried chillies and remaining cinnamon sticks and star anise pods. Place the duck in a bowl and refrigerate for a while. Me, I marinated it for two days.

A hour before cooking, remove the duck from the refrigerator. Take the shallot and peel it, before jamming the four or five extra cloves into the surface. Stuff the shallot, along with the crushed garlic cloves, into the duck's cavity before trussing the bird by binding the tips of the drumsticks together. Simple, but effective. Rest the remaining two dried chillies between the wing and the breast.

Fifteen to twenty minutes before cooking, pre-heat the oven to 120*C. Place the duck over rack in a roasting pan breast-up and roast at this temperature for 1 hour and 45 minutes. Remove from the oven. Crank the oven up to 200*C. After five minutes, return the duck to the oven. Meanwhile, combine the light soy sauce and honey. After fifteen minutes of cooking, remove the duck from the oven again. Brush the honey/soy sauce mixture all over the duck, before returning the duck to the oven for another fifteen minutes of cooking. At this point, poke the thickest part of the thigh with a skewer to test doneness. If the juices run clear, your duck is cooked. If they're pink, return the duck to the oven for another five minutes. Remember that it's okay to serve duck a little rare.

Rest the duck a good ten minutes before carving.

Tips and ideas:

There's no good reason to not experiment with this dish. I reckon a small lump of ginger would go nicely in the cavity during the cooking process and that, too, some sort of citrus fruit--lemon, lime, maybe even kaffir lime--could add a lot to the flavour.

Lemon and pepper chicken

Photobucket

1.2 kilogram chicken (see: tips)
4 cloves garlic
2 lemons
1 onion
1 tbs freshly ground black pepper
1 tsp freshly ground Sichuan pepper (see: tips)
sea salt
olive oil
a little extra lemon juice

Pre-heat oven to 200*C.

Wash chicken inside and out. Pat dry. If you've bought a chicken with a plastic bag of giblets kicking around in the internal cavity, obviously you should remove it. Place the chicken on a chopping board and using either a cleaver or the rear part of a sharp, heavy knife, remove the wing tips. Carefully remove the flabby skin from where the chicken's neck used to be. Now you're ready to season the bird.

Rub some sea salt, as well as the ground pepper, all over the bird. Don't miss any spots. Be sure to rub some inside the cavity, under the wings, around the legs. You may need to grind more pepper.
Slice the lemons into thin wedges and the onions into quarters. Simply peel and crush the cloves of garlic. Stuff the cavity of the chicken with a few lemon wedges, a couple of onion quarters and some of the garlic. Retain the rest of the lemon, onion and garlic to scatter over and around the chicken during cooking.

To truss the bird, take a small length of twine. Bring the tips of the drumsticks together as if the bird is laying on its back with its knees up and its legs pointing towards its arse. Bind them together. Make sure you're not using some kind of plastic-based twine.

Place the bird breast-up in a roasting pan. Scatter all but one of the remaining lemon wedges over and around the chicken. Scatter the remaining onion and garlic around the bird. Drizzle a little olive oil over and around the chicken, then squeeze some lemon juice over the top. Place the chicken in the oven and roast for 45-50 minutes, basting regularly. The cooking time is non-specific as, yeah, ovens and chickens vary. To test that your chicken is done, jam a skewer or cake tester into the thickest part of the chicken's thigh. Juices will run out. If those juices are clear, the chicken is cooked. Remove it from the oven and let it rest for 10-15 minutes before carving. If they're even a little pink, keep it in the oven for a while longer. When the chicken is carved, squeeze a little extra lemon juice and grind some black pepper over the top.

Tips:

Ideally, you'll be using corn-fed, free-range or organic chicken. Fully organic chickens are expensive, so look at the two former options. Both are, at least in Australia, slightly more expensive than your regular, battery-raised hen, but the taste difference is significant.

Sichuan peppercorns can be found in some supermarkets, but your best bet is a Chinese grocery store. Despite the name, they look quite different to the black, white and green peppercorns we're familiar with in Western cooking. The aroma and flavour are different too, which is why I used them in this dish. Don't stress if you can't find them, though. Too, I mean, I reckon white peppercorns would be swell here. You could replace the lemons with lime, if you want.

Finally, serving. A 1.2 kilogram chicken is enough for a couple of people with decent appetites. If you're serving more people, obviously more birds or, rather, a larger bird, is in order. Adjust cooking time as necessary. A 1.6-1.8 kilogram bird would take maybe a hour to a hour and fifteen minutes. Serve this dish simply. Me, I serve it with steamed rice and a basic, usually.

Roast pork with a jerk marinade

Photobucket

You know, I've never roasted pork before. Done chicken, done duck, done goat, but never pork. This was inspired as much by a jerk spice mix I stumbled upon as my girlfriend's love of jerk dishes. Jerk, by the way, is a Jamaican thing. It refers to a cooking technique that involves marinating and then slow-cooking. Seeing as this was an experiment on my part, the quantities and ingredients aren't set in stone. Feel free to experiment. Adjust the spices to suit your tastes. Cooking shouldn't feel like you're working in a laboratory.

That being said, there's one rule I always, always, always follow in my kitchen--all spices, from sea salt to allspice, are freshly ground. You can use a mortar and pestle, as I do, or one of those electric spice grinders. Whatever. But grinding the spices as you need them makes for superior flavour and aroma.

Ingredients:

1.5 kilogram (3.3-3.4 pound) boneless pork shoulder, rolled
2 dried chillies (optional)
4 teaspoons freshly ground allspice
2 teaspoons mild chilli powder
1 teaspoon freshly ground black pepper
1 teaspoon freshly ground dried thyme leaves
1/2 teaspoon freshly ground white pepper
pinch of sea salt
dark rum
Malibu (white rum with coconut--you can use regular white rum or even dark rum if you don't have this)
olive oil

In a small bowl or cup (me, I always use a tea cup) combine the allspice, chilli powder, black pepper, thyme leaves and white pepper. Gradually add the dark rum, stirring as you do. What you're aiming for is a thick paste. How much rum? Well, that depends. If you use chilli flakes instead of powder, it'd change. If your spices are ground really fine, it'd change. For me, one of those miniature bottles of Bundaberg dark rum was perfect. After I'd made the rum/spice blend I had just enough liquid left over to splash over the pork before placing it in the oven.

Now, take the pork. If the butcher hasn't already scored it, you'll have to do that yourself. Make shallow incisions--a lot of folks use a box cutter for this, but a sharp paring knife will do the job equally well--across the skin. Don't cut too deep. The goal isn't the hack into the flesh.

Once the incisions have been made, rub a little sea salt into them. Salt helps the skin go all crispy during the cooking. Next, take the rum/spice blend and rub that into the pork too, ensuring you work it into the incisions. Take the two dried chillies, if you're using them. At either end of the rolled pork shoulder, you should be able to feel a hole where the bone once was. Jam the chillies into these holes, working them in with your fingers.

Place the marinated pork into a bowl, cover and refrigerate for at least a couple of hours. The longer the better, really.

When you're about ready to cook, remove the pork from the refrigerator and pre-heat the oven to 220*C (about 430*F). Now, the pork. Shoulder is a fatty cut. Under all that skin, there's just a stupid amount of fat. And that's good, right. Fat is flavour. But what's not good is when fat leaks from the meat and ends up, well, stewing the meat. So what you need is a roasting pan with a rack that can hold the meat above any liquid that leaks out. If you don't have one of those, though, don't despair. Place the pork skin side up and use a couple of long, metal skewers will do the job--just spear the pork maybe a centimetres into the 'base', then balance the skewers on the side of the roasting pan. Like so:

________PORK_____________
| |
|______PAN_________|

Yeah, sorry for the bad ASCII art, but I didn't think to snap a photo of my dodgy skewer/rack contraption.

Pour a splash of dark rum and a little olive oil--no need for too much--over the pork. Roast at 220*C for 30 minutes. Then remove it from the oven. Deglaze the pan with a splash of Malibu, drop the oven temperature to 150*C (300*F, I believe) and return the pork to the oven another 3 1/2 hours. Remove from the oven every so often to baste with the flavoursome grease that collects at the base of the pan. Don't worry if, early on, the kitchen reeks of Malibu. The flavour and aroma will mellow during the cooking process.

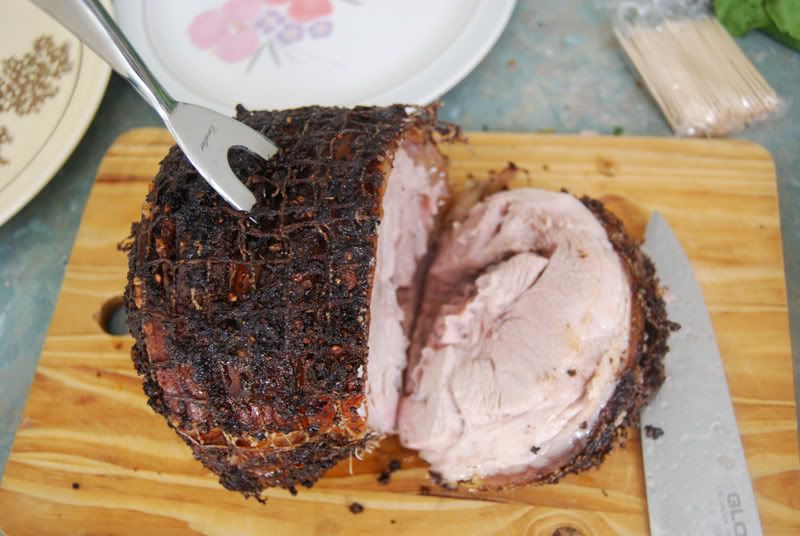
When the pork is finished cooking, remove it from the oven. Let it sit for a good 15-20 minutes uncovered before carving.

Tips and ideas:

This dish, as noted earlier, was an experiment on my part. As such, you should experiment with it.

Consider ditching the pork shoulder and using slices of belly or rib instead. Grilled slowly over a coal fire or on a barbecue, they'd surely be lovely. You could use the same marinade with boar, even. That'd be more authentic than domesticated piggy. You could use chicken, too--either a whole bird or the legs.

As for the 'stuffing' of dried chilli, that could be replaced or added to with a spring or two of fresh thyme.

This dish keeps wonderfully. I had the leftovers cold the following day in a sandwich and they were quite delicious.